
| 5. PHOTOSTUDIO 5.1 Menu bar 5.1.1 Open project 5.1.2 Save project 5.1.3 Print 5.1.4 Forward/Back 5.1.5 View buttons 5.1.6 Rocket mode 5.1.7 Help 5.1.8 Show/hide object list 5.2 "Object list" tab 5.2.1 Create/remove object list 5.2.2 Object properties 5.2.3 Brightness/contrast of objects/ColorChecker 5.3 "Prepare" tab 5.3.1 Tools: Area 5.3.2 Tools: Grid 5.3.3 Tools: Retouch 5.4 "Design" tab 5.4.1 Collections 5.4.2 Favourites 5.4.3 3D objects: CapaCoustic Melapor & NMC 5.4.4 Copy colours/materials into the object list 5.4.5 Multiview pictures |
5.3.1 Tools: Area
To create an area, an object must be active in the object list. The area is then assigned to the active object. (Objects: see chapter 5.2, "Object list" tab)
Add areas to objects The "Area" tool defines an area for subsequent design with colour and material. Any number of areas can be created within an object. They are given the same colour or material assignment during design. You can assign a colour to the object by masking it with the "Area" tool. If materials are to be added to the design as well (e.g., spatula techniques, wood, tiles, ...), a "Grid" is necessary in addition to the area for reasons of perspective. (See chapter 5.3.2, "Tools: grid") NoteA grid can only be created where an area is already available. Create area To create a new area within an object, first select the appropriate object in the object list. Then click the "Create Area" tool. Begin by defining corner points for your area through mouse clicks - the tool automatically connects up the points you set. To close the area, double-click the starting point for your area when setting the last point with the mouse. (The area has been closed correctly when the line for preparing areas no longer follows the mouse pointer.) Alternatively, you can close the area automatically by double-clicking the next to last point. Note: If you would like to remove individual points during creation of an area, click the "Backspace" button on your keyboard. The point created last is deleted with each respective click. You can then continue completing the area. After closing one area, you can define further areas within the same object in the same way. To do this, click the "Create Area" tool again and define your area as described above. Note: : Please note that all areas within an object are assigned the same colour and materials during design. If you want to cut a polygon out of an existing area, e.g., allow for a window in a façade, create a new area within the existing area using "Create Area". The intersection of the areas is cut out. Use a test colour to test the result. Move points/lines Once you have created an area, you can optimise its position by moving points and/or lines, adding new points or deleting existing points. Note: The "Move" tool is automatically selected after an area has been created. Move individual points by selecting the "Move" tool, clicking a point (active points are red, inactive points are green) and dragging this to the position you require while keeping the left-hand mouse button pressed. Move individual lines by selecting the "Move" tool, clicking a line and drag it with the mouse to the desired location (non-selected lines are blue, selected lines are yellow; the two points adjacent to the line are red). The line end points are moved in parallel and the adjacent lines distorted accordingly. 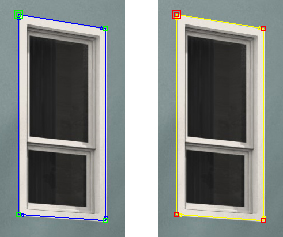 To move all the areas within an object, click the image outside the polygons to deactivate all areas. Press the "A" key on your keyboard "to select all" and then hold down the left mouse button and "Ctrl" key when moving the mouse. Add points When you activate the "Add point" tool and then click a line within an area with the mouse pointer, a new point is set at this spot. You can see that you are on the line with the mouse pointer because it turns white. You can position the newly created points using the "Move" tool. Delete points/lines Activate the "Delete point" tool to remove individual points. When you then click a point, it is deleted immediately. The area remains closed since the adjacent points and/or lines are connected automatically. Alternatively, you can remove individual points and lines within an area by marking the required points and/or lines (active points are red, active lines are yellow) and then pressing the "Del" key on your keyboard. The respective selection is removed immediately and adjacent points and/or lines are connected automatically - the area remains closed. Note: You can open a closed area again by using the "Delete point" tool to click the start/end point. This point is displayed larger than the other points. The line to create the area begins following the cursor again; you can now create additional points or delete points with the "Backspace" key. 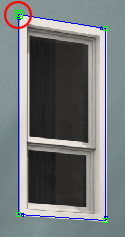 Delete area To delete an area, choose the "Delete area" tool and click a line/point on the area you want to remove. The required area is deleted when you confirm your selection by clicking "Yes". Create area with magic roll The "Magic roll" lets you create a selection without having to set masking points with the "Create Area" tool. The resulting selection can only be filled with a colour. If you want to use a material, you also need a grid (see chapter 5.3.2, "Tools: Grid") The magic roll recognises edges in the image and selects areas that are bordered by these edges. This tool is well-suited to rapid visualisation when the image contains large areas. Magic roll + The "Magic roll +" tool recognises edges in the image automatically. To make a selection, click a point within your area you want to select. The magic roll automatically selects the area around that point up to the edge of an adjacent area. If you click the image again, the areas are added automatically. Note: The "Draw mask" tool can be used to correct unclean areas or for to enlarge your selection manually. Magic roll - You can use the "Magic roll -" tool to delete a previously defined selection. To do so, click the area you want to remove. If you want to remove additional areas, click again. NoteSelection areas can also be removed with the "Eraser" tool. Brush Note: To create a straight line, set the starting point with the left mouse button. Then press and hold the "Shift" key while setting the desired end point with the mouse. A straight line is drawn automatically between the two points. Tool tip sizes There are four differently sized tool tip sizes available in sizes 8, 16, 32 and 64 pixels for use with the "Eraser" and "Brush" tools. Eraser Selection areas which you have created with the "Magic roll", "Magic wand" and/or "Brush" tools can also be removed. To do this, select the "Eraser" tool and correct your mask accordingly. Magic wand + You can use the "Magic wand" tool to define a selection within an active area, for example, if you want to leave out a tree in front of a façade. A numeric value from 0-99 regulates the sensitivity with which the magic wand automatically recognises similar colour nuances. This value is set to 15 by default. The lower the numeric value, the more sensitive the magic wand reacts to similar colour nuances and the selected colour area is restricted. To make a selection, click a point within your area which is to be included in the selection. The magic wand automatically marks all the parts of the area with a similar brightness (depending on the brightness setting). If you click the image again, the areas are added automatically. Note: The "Draw mask" tool can be used to correct unclean areas or for the manual enlargement of your selection. Magic wand - The "Magic wand -" tool lets you subtract an area from the current selection. Note: Selection areas can also be removed with the "Eraser" tool. Delete mask This function can be used to completely remove selection areas within the object which you created with the "Magic roll", "Magic wand" and/or "Brush" tools. Test colours for areas 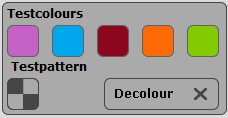 An area can be filled with a test colour to see if it has been correctly defined. There are five test colours (magenta, cyan, red, orange, green) available for this. Thanks to colour differentiation with different test colours per object, better orientation can be achieved in the image. Select the object concerned and then one of the test colours. All the areas belonging to this object are assigned the selected colour. If you change the size of the area after you have added a test colour, your corrections are not updated until you click the test colour field again. To remove the test colour, click the "X" beneath the test colour fields. Note: The test colour in the image should appear identically to the test colour screen on the left. If the test colour appears darker in the image (for example, if the wall is not white in the original image), then correct the brightness with the trackbar in the object list on the right-hand side. This is very important to prevent the colours used later for design being too bright or too dark. (See chapter 5.2.3, "Brightness/contrast of objects") Note: The test colours are overwritten during design and are no longer visible.
|